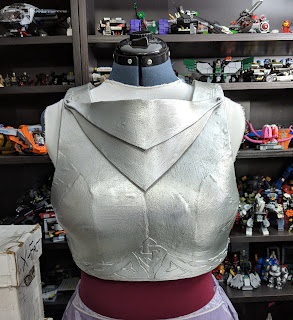
The link to part 1 is here, and ended with the second version of the breastplate formed and ready to be decorated:

Since I'm not very good at freehand painting designs, particularly on a curved, irregular surface, I decided the best way to add a design to the bottom edge would be to cut it out of something and stick it on so it wouldn't move around. Initially I thought craft foam would be best, but I tried a section and it was weird having squishy designs on a "metal" breastplate, so I ended up using a single sheet of Worbla. That actually turned out to be easier, as I could just lay the pieces in place and heat them up to get sticky, rather than faffing about with adhesives.
As per usual, however, while I was prepping to do that, the gorget (neck armor) started bothering me. In the comics, the gorget is two pieces, and I'd thought I would just add a line in the middle of it to resemble two pieces, but the more I looked at it, the less I liked having a huge, fixed gorget. I set aside the designs for a moment and went back to making paper drafts of an articulated gorget and broaches to cover the ends. Eventually ended up with a decent pattern, and was ready to move on:

I was woefully unprepared for how much work it would be to cut finicky designs out of Worbla. I'd initially thought I could cut it out, place all the pieces on a piece of tape, and then just lay out the tape and heat them into place. It might have worked, too, except I used regular scotch tape so I could see through it and gauge where the pieces were sitting. I quickly discovered that the melting point of scotch tape is well below the sticky point of Worbla, so I literally had to place each piece by hand. I did, at least, realize that I could use the cut-out bits to trace a guide on the breastplate, so placing them was a bit easier, but it still took a good couple hours to cut out and a couple more to heat them into place.


Next step was adding the closures, a fairly simple process involving small strips of Worbla rolled into a loop around a d-ring on one end. I attached the loop side to the edges of the breastplate and the extra length of the tabs to the inside, and it seems sturdy enough for cosplay.

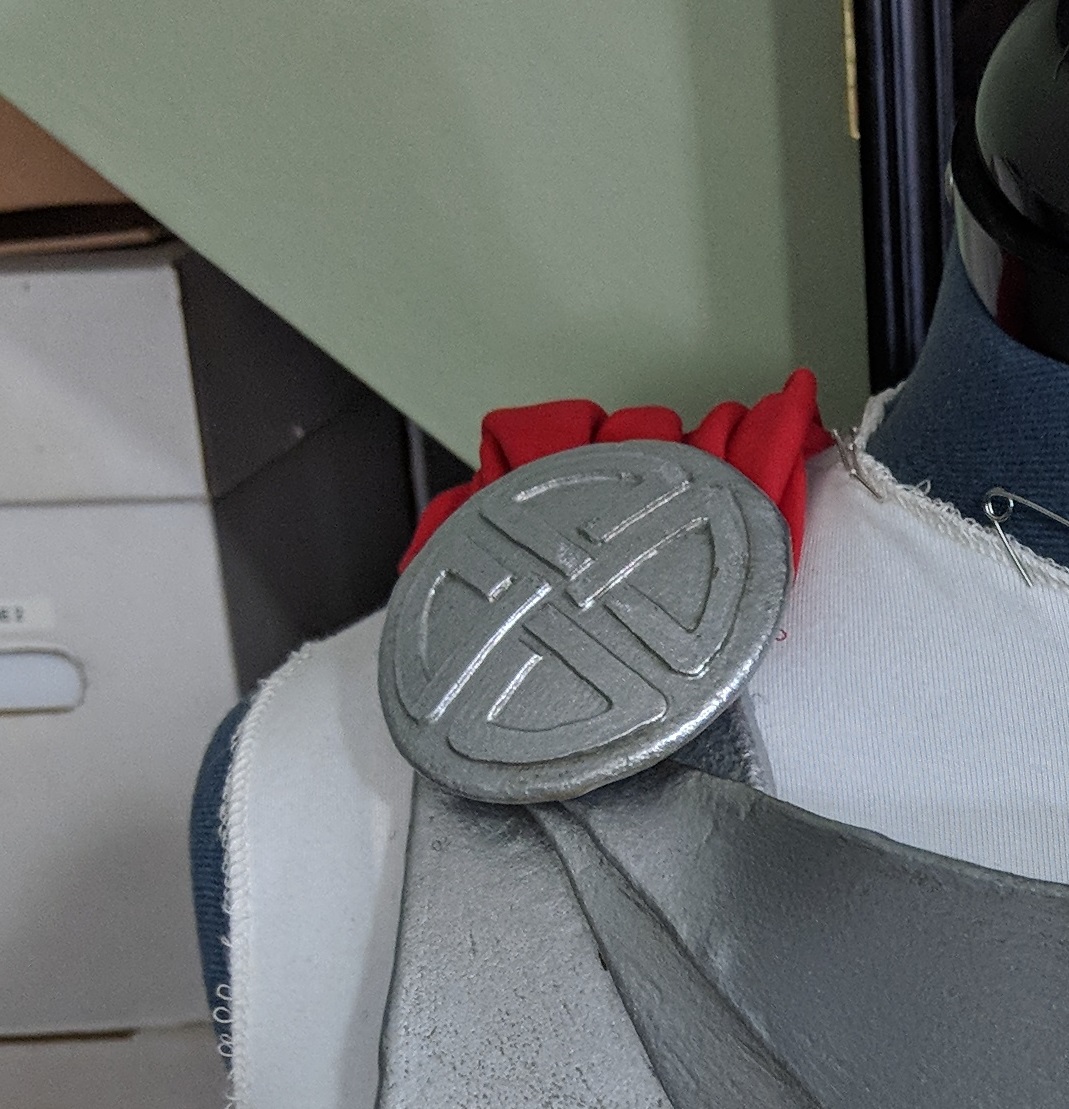
The shoulder broaches looked a little plain once the breastplate was decorated, so I found, sized, cut out, and attached a simple knot to give them visual interest, and made them convex to cover the gorget and cape ends. I waffled a bit on how to attach the gorget, and ended up making small holes in the ends of both pieces, then punched a hole in the breastplate and stuck ear plug tunnels to cushion the edges and prevent fraying. A piece of twine pushed through all that and knotted at both ends keeps the gorget in place while still allowing for movement.
(What I thought was) the final step was painting. It took some interesting propping up, but I taped off the d-rings and covered the whole thing in wood glue, paint, weathering, and clearcoat. Once again, I lucked out that the errors I'd made in putting the Worbla on looked like battle damage, rather than, well, errors. I deeply appreciate this quality of Worbla. So, ta da! Breastplate! Done, right?
No, of course not. Having nowhere else to store it, I left it on the sewing dummy as I kept working on other things, and something about it bothered me. You could see the design... sort of... if you were up close, but from any distance, it sort of faded into nothingness. I experimented with painting the raised edges of the design on the of the broaches and it made a huge difference:


Sigh. Ok, fine, back to work. I sat there, carefully painting just the 1mm tall edges of the entire design pattern with a teeny tiny brush for close to 3 hours, then hit it with another road of clearcoat. Pain in the tail? YES. Worth it? Yeah, I think so. It looks much more defined, and slightly comic book-y, which in this case is a good thing.

Total time on v2 of the breastplate: just under 50 hours. Total time on both versions: 61.4 hours. There are, of course, things I'd like to change and do better on the next one, but for a first go, I'm pretty happy with it.

Since I'm not very good at freehand painting designs, particularly on a curved, irregular surface, I decided the best way to add a design to the bottom edge would be to cut it out of something and stick it on so it wouldn't move around. Initially I thought craft foam would be best, but I tried a section and it was weird having squishy designs on a "metal" breastplate, so I ended up using a single sheet of Worbla. That actually turned out to be easier, as I could just lay the pieces in place and heat them up to get sticky, rather than faffing about with adhesives.
As per usual, however, while I was prepping to do that, the gorget (neck armor) started bothering me. In the comics, the gorget is two pieces, and I'd thought I would just add a line in the middle of it to resemble two pieces, but the more I looked at it, the less I liked having a huge, fixed gorget. I set aside the designs for a moment and went back to making paper drafts of an articulated gorget and broaches to cover the ends. Eventually ended up with a decent pattern, and was ready to move on:

I was woefully unprepared for how much work it would be to cut finicky designs out of Worbla. I'd initially thought I could cut it out, place all the pieces on a piece of tape, and then just lay out the tape and heat them into place. It might have worked, too, except I used regular scotch tape so I could see through it and gauge where the pieces were sitting. I quickly discovered that the melting point of scotch tape is well below the sticky point of Worbla, so I literally had to place each piece by hand. I did, at least, realize that I could use the cut-out bits to trace a guide on the breastplate, so placing them was a bit easier, but it still took a good couple hours to cut out and a couple more to heat them into place.


Next step was adding the closures, a fairly simple process involving small strips of Worbla rolled into a loop around a d-ring on one end. I attached the loop side to the edges of the breastplate and the extra length of the tabs to the inside, and it seems sturdy enough for cosplay.

The shoulder broaches looked a little plain once the breastplate was decorated, so I found, sized, cut out, and attached a simple knot to give them visual interest, and made them convex to cover the gorget and cape ends. I waffled a bit on how to attach the gorget, and ended up making small holes in the ends of both pieces, then punched a hole in the breastplate and stuck ear plug tunnels to cushion the edges and prevent fraying. A piece of twine pushed through all that and knotted at both ends keeps the gorget in place while still allowing for movement.
(What I thought was) the final step was painting. It took some interesting propping up, but I taped off the d-rings and covered the whole thing in wood glue, paint, weathering, and clearcoat. Once again, I lucked out that the errors I'd made in putting the Worbla on looked like battle damage, rather than, well, errors. I deeply appreciate this quality of Worbla. So, ta da! Breastplate! Done, right?

No, of course not. Having nowhere else to store it, I left it on the sewing dummy as I kept working on other things, and something about it bothered me. You could see the design... sort of... if you were up close, but from any distance, it sort of faded into nothingness. I experimented with painting the raised edges of the design on the of the broaches and it made a huge difference:

Sigh. Ok, fine, back to work. I sat there, carefully painting just the 1mm tall edges of the entire design pattern with a teeny tiny brush for close to 3 hours, then hit it with another road of clearcoat. Pain in the tail? YES. Worth it? Yeah, I think so. It looks much more defined, and slightly comic book-y, which in this case is a good thing.

Total time on v2 of the breastplate: just under 50 hours. Total time on both versions: 61.4 hours. There are, of course, things I'd like to change and do better on the next one, but for a first go, I'm pretty happy with it.
No comments:
Post a Comment